June 16, 2010

Making Fondant Cutouts: Kai-Lan and Friends


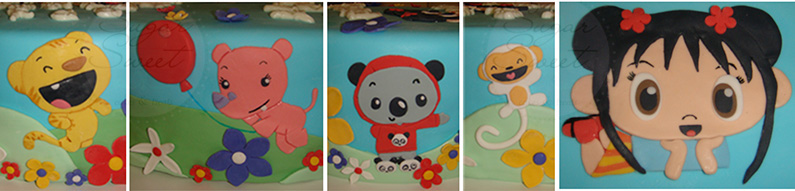
There is so much to learn about cake decorating, the different tools and techniques, and from so many wonderful and talented people!  Although I'm still learning myself and have only been decorating a handful of cakes for family and friends, I do enjoy sharing and helping others, so ask, and you shall receive.  One request I get a lot is, how did I make the Kai-Lan characters used on my cakes.  So, here they are, detailed and complete with pictures so you too, can make them.


Disclosure: This post may contain affiliate links and if you click on the link and purchase the item, I may receive an affiliate commission at no extra cost to you.

Most of the time, I am able to find pictures over the internet to use as templates or, I end up standing in front of the TV, with a camera in hand, and take photos while the show or movie is playing to capture images that look like something I want to replicate.  I then upload them into my computer, select the ones I like, place them across a page scaled to the size I need for the cake in either Microsoft Word or Adobe Photoshop, then print them out on regular, copier paper. 

How to make Kai-Lan out of Fondant and/or Gumpaste:
If you use fondant, mix a tiny bit of Gum-Tex or Tylose Powder into it to help it dry stiffer and harder.


Step 1 (Face/Body)
- Trim out the paper to use as a stencil, roll out the fondant to about 1/8” thick, dust the top of the fondant with some corn starch to keep the paper from sticking to it, then lightly trace out the outline of the entire character over the fondant.  This will serve as the base of the cutout and you will build up the features up on top of it.


Remove the paper template, then and with a sharp blade, trim out the cutout and remove the excess fondant.  Next, with a scoring tool or tip of a toothpick, lightly indent in some of the details such as the outline of the face and arms as shown.

My favorite tool I like to cut fondant with is a #11 Surgical Blade.  They're sharp!  Be careful when using these since they slice through things really easily.  There are a variety of different blades available but my most preferred one, is #11 to use with fondant.


Step 2 (Hair) – Roll out, very thinly (almost paper thin), black fondant, dust it with cornstarch, lay the stencil back over it, carve out the outline of the hair lightly, remove the paper, trim out the bangs 1st, then trim out the outline for the rest of the hair about ¼” larger than the actual outline. Flip the black fondant cutout to it's back, brush the back with a tiny bit of water, then carefully place the hair over the head area. Smooth the extra black fondant down and over the sides of the cutout and trim off the excess (this way, you won’t have any of the beige around the sides).

For the strands of hair hanging over the ear, roll a extra piece of fondant up under itself to give it some height and match up to the height of the entire cutout, then trim it into shape. 


.
Step 3 (Eyes) – the dreaded eyes! These were so hard to get right.  If you place the pieces incorrectly, you get googly eyes - LOL!  I wanted the eyes to be flat so I stack the 3 colors of the eyes one on top of each other (white, brown, black) then rolled it flat with a rolling pin.  You need to make each piece of the eye slightly smaller than the actual size you need so that when it's flattened, it's the right size.  Use round piping tips of different sizes to cut the circles out, then trim off the side’s to create ovals.  Make 2 eyes at the same time so they look alike and lay them next to each other (see picture above on the left). With a rolling pin, gently and carefully with even pressure, roll the eyeballs flat (picture above on the right). If it doesn’t work and the eyes get all wonky, you have to remake them.  I don’t use any water between the layers to make them stick.


Step 4 (Assemble) – Roll out very thin snakes of fondant for the eyebrows and lashes or draw them in with an edible marker.  I used fondant for the eyebrows, nose and mouth, then an edible marker for the lashes. Wet the back of each eye and carefully place on the face.  I then painted the highlights on the eyes with white gel color diluted with almond extract. Add the shirt. Use a small petal cutter for the red flowers in the hair but let them dry separately overnight so they get hard and sit flat. The following day, attach the flowers to her hair.

Repeat with the other characters…Tolee, Rintoo, Hoho, Dolphin, the Platypus…

Cut out various sized flowers; lay them over a piece of wrinkled foil to give it some shape and let everything dry overnight. I like to put everything in the oven with the pilot on overnight so that they dry faster and are also out of the way from the kids.


The cutouts above were for a Beach Themed Cake made to be raffled off at a local cake club.  I included a sketch of how to place the decorations around the cake if the winner decided to make a Beach Themed Kai-Lan Cake.


I hope these instructions will help you with making cutouts in general.  You can apply the same techniques to character.  Just think of layering on the details and try to keep each layer thin so the decorations are not so bulky.  Let me know if you have any questions…I'm here to help!

15 comments:

  1. May I just say, I am SO, SO, SO, SOOOO thrilled to find your blog!!!!!!! I have been pouring over your posts & scribbling down your recipes & tips like a mad woman!! :) :) :) :) Sideways smiley faces do nothing to convey my delight, lol!
    I started making cakes in February of this year & have fallen in love with the art, but have SO MUCH to learn. Thank you, thank you, thank you for this blog! It's like a Christmas present for me, I'm not even kidding :) I have so many questions, but I will not ask you all of them right now, I'll just keep reading & see if I find my answers :)
    If you feel so inclined, here is my cake blog; http://thebluecakecompany.blogspot.com/
    I would LOVE ,love, love, love any tips you have to offer :)
    I'm just starting to try my hand at figures & am not sure how to make them hold their shape. I've tried modeling chocolate a couple times but was basically just making it up as I went, so I'm super excited to try your methods!
    I could type all day, lol :)
    Once again, thank you for this blog, I am your new biggest fan already!! :)

    ReplyDelete
  2. I'm glad you are finding help here =) Plenty of practice and a lot of trial and error. Good luck and I'm here if you have any questions.

    ReplyDelete
  3. I saw the pic of this cake as your avatar on cakecentral and was pulled like a magnet to check your blog. These decorations are awesome! I don't usually like kid's cakes too much because it seems to me people get a bit messy and unrefined, which is all the contrary here! And yes as said above, THANK YOU for your your precious advice! A great service for who's trying to learn like me... as I'm writing from Italy, grazie ;)

    ReplyDelete
  4. My five year old is obsessed with Kai Lan and does some amount of cake decorating herself (ie most of her own birthday cakes, and she enters the Austin cake show). I think if I show her this and go through the steps with her and give her some nice soft Satin Ice, she might be able to make her own Kai Lan cake sometime soon.

    Thank you kindly for the instructions!

    ReplyDelete
  5. yey, so happy I found your blog. I started out in make cakes too. Took 3 Wilton courses and it really helped me out a lot!! I have a friend at work who likes my cakes and she said she wanted me to make a cake for her daughter in december. The theme is Kai Lan. I was like "who is that?"...lol! I don't have kids....so go figure! I was saying to myself....OMG, what am I going to do now? I googled and googled and said "how am i going to make figure?"...omg!!! I came upon your blog and the angels were sighing and clouds faded and blue skies, and sun came out!!! Yey!!!! Thanks for posting this tutorial! Now I can breath better!!!! LOL!!! Gonna add you to my side link bar at my blog!!! Please visit! I love for you see what I created so far. I may pop here and there and ask a lot of questions!!

    New bloggy friend!
    Yaneri
    www.sweetbakesofmine.com

    ReplyDelete
  6. Thank you Yaneri and I'm following your blog as well =) Happy caking!

    ReplyDelete
  7. This is awesome! I love making my daughter's cake every year and was worried i've have to finally let wally world do it. But with this i am going to make it myself! thank you

    ReplyDelete
  8. Your cakes are so fabulous and this tutorial is fabulous. I have one question how far ahead can you make something like this. I may have a Mario Bros cake in a couple weeks and now I will be overwhelmed if I don't get some work done ahead to time if possible.

    ReplyDelete
  9. Thanks Cakemom68. You can make them far ahead of time (1 week, 1 month, etc).

    ReplyDelete
  10. How do you store these cutouts if you make them ahead? Are they still flexible enough after 2 weeks? I assume some of them need to be flexible to wrap around the cake like the kite or sun in your cake. My son is obsessed with Backyardians and seeing how time consuming to make these, I want to get started as early as possible.

    Thanks,
    NhatHa

    ReplyDelete
    Replies
    1. Hi NhatHa,

      If you want them to dry flat, just keep them in a box away from sunlight and heat (I use a clear, plastic storage shoe box and put them away in a dark cabinet). If you want them to stay flexible, put them between layers of parchment paper with a dusting of cornstarch, seal it up inside a zip lock bag or in a plastic container and store them flat in the freezer. When you're ready to use them, remove it out of the freezer, immediately remove the cutouts and lay them flat over foam or parchment paper and let the condensation dry off for a couple minutes before touching them and putting them on the cake. Or, You can also dry the cutouts up against the side of a cake dummy or cake pan that's the same size as the cake - that way they dry with the right curve to them.

      Delete
  11. Thank you so much Angela! Your blog is amazing! I am a great fan.
    Nhatha

    ReplyDelete
  12. i need help to ake kai lan figurine.i dont know how.

    ReplyDelete
    Replies
    1. Try this: http://sugarsweetcakesandtreats.blogspot.com/2011/02/kai-lan-cake-decorations.html

      Delete