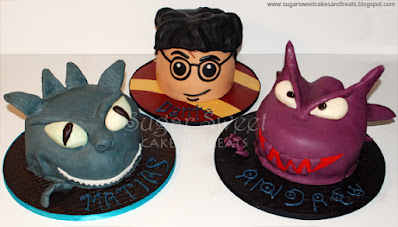
We did a joint birthday party with 2 brothers and my son. Each kid told me who their favorite character was and these are the cakes I made for each of them: Toothless from How to Train Your Dragon, a LEGO Harry Potter, and Haunter from Pokémon. The cakes were actually carved from a Costco sheet cake, re-frosted, then decorated in Marshmallow Fondant and Modeling Chocolate. Here is how I made them.
I was out of town on a business trip and returned with only 2 days to pull the cakes together and finalize the party details. Due to the time constraints, I bought a Costco sheet cake to save time in baking and making frosting. Each kid gave me their requests the week prior and I spent the rest of the week trying to figure out how to incorporate 3 different themes into one cake. I ordered the cake from Costco on Thursday for a Friday noon pickup. It was a vanilla cake with cream cheese mousse filling and plain, white buttercream. "NO DECORATIONS!" was written on the order slip in big letters. I didn't have a clue what I was going to make of the sheet cake until Thursday night. I figured out that I could carve 2, 6-inch cakes and 2, 5-inch cakes off one sheet cake (11x15 inches) and carve each character's head out of the cakes. It turned into a perfect solution giving each kid their very own personal cake!

I picked up the cake Friday at noon and put it into the freezer to help it firm up before carving. At 6pm, I pulled the cake out of the freezer and scrapped off as much of the buttercream as I could. They were not kidding when they said there were 2 lbs. of frosting in each sheet cake! I then used a 6-inch and 5-inch cake circle as a template to cut down the cakes to size and put them back into the freezer to stay firm while I worked on carving and shaping each cake individually.
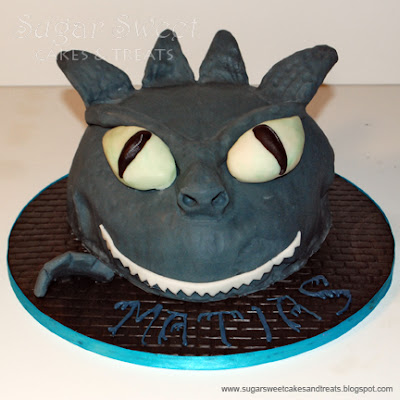
I used the extra cake pieces to build up the front of Toothless (he's the one pictured above in the front covered in buttercream). I also used the cake scraps to make the spikes on Haunter (he's the one on the back, left pictured above. Harry Potter was easier and I just had to stack the 2, 5-inch round cakes (pictured above on the back right side). I then used the buttercream scrapped off to Costco sheet cakes to cover all 3 cakes and let them sit out at room temperature while I covered each of them with modeling chocolate.
Covering a Cake in Modeling Chocolate Tip: Make sure your cake is at room temperature when covering it with modeling chocolate. A cold cake will make the chocolate set hard fast giving you no time to sculpt it into shape or smooth and blend the seams out.
I typically just roll out fondant directly over the table dusted with powdered sugar but the modeling chocolate kept ripping every time I tried picking it up. Therefore, I ended up rolling it over parchment paper dusted with powdered sugar instead to help keep it together and in one piece. I then rolled the modeling chocolate up with the parchment, flipped it over the cake so that the modeling chocolate is up against the cake and the parchment paper is on top, and then unrolled the rest of the modeling chocolate over the cake. Once in place, I carefully peeled off the parchment paper and smoothed it out into shape, trimmed off the excess, and built up the features with additional modeling chocolate. I used a small, metal, ball-tipped tool to smooth and blend the seams together since my fingers were too warm to use. The ball-tipped tool also got into the smaller areas much easier and helped create the skin texture of the dragon.
Toothless from "How to Train Your Dragon":
To make the modeling chocolate for Toothless, I used Blue Wilton Candy Melts for the base then kneaded in a little bit of AmeriColor Black Gel Paste with some of the purple modeling chocolate from the Pokémon into it. It created the perfect shade of grey for the dragon. The dragon's eyes were sculpted with white modeling chocolate. The cake board is covered in Marshmallow Fondant (MMF) and impressed with Duff's Brick Impression Mat. His name is hand piped in royal icing and the font style can be found for free on Dafont.com and is called Dragon Font.
Harry Potter LEGO Cake:
Harry Potter's head and cake board are covered in Marshmallow Fondant (MMF) while Harry's hair and black features are modeling chocolate. I used Wilton Dark Chocolate Candy Melts and kneaded in some AmeriColor black gel paste to get it super black. The name on the cake board is hand piped with Royal Icing.
Haunter, a Ghost Pokémon Character:
On Haunter, I made the modeling chocolate using Wilton Lavender Candy Melts for the head and white modeling chocolate on his eyes. The red mouth is Marshmallow Fondant (MMF) since I already had it on hand. The board is covered in Marshmallow Fondant (MMF) and impressed with Duff's Cobblestone Impression Mat. The name on the cake board is hand piped in Royal Icing in a font, also found for free on Dafont.com, called, Unown. In doing research on each character, I discovered that Unown's are evil characters in one of the Pokémon movies? I thought it would make the cake extra unique and special to create my son's name in the Unown font...pretty cool!
By the time I was done decorating all 3 cakes, it was 2am Saturday morning - 1 night (8 hours in total) - phew!!! I was actually able to pull it off!
The cakes were a huge hit at the party. Matias, Dante, and their mom were expecting a single sheet cake with some simple characters cut out with fondant on them. They were completely surprised to each have their own, customized 3D cake and loved them! I just love surprising people...one of the best and most rewarding things about decorating cakes - making people happy and having them smiling really big on their birthday...and it makes for great pictures!


