August 28, 2010

Barney and Friends Cake (and Modeling Chocolate & RKT Recipes)


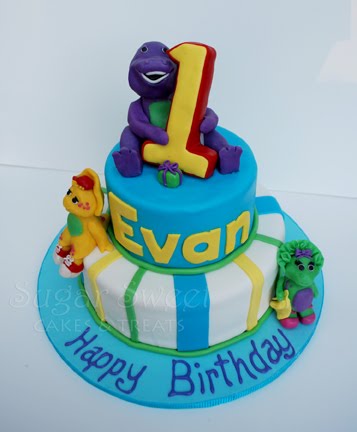
A Barney, BJ, and Baby Bop cake for little Evan who turned 1.  Although I find Barney quite annoying, after playing a couple episodes to get an idea of what the dinosaurs looked like and to capture all their little details, my own 3 year old now loves Barney too, and requests to watch it EVERY day...oh well!  He does have very catchy songs that kids love singing along.


The figures were sculpted with Rice Krispy Treats (RKT) cereal then covered with modeling chocolate.  I made the RKT without butter, just a tiny bit of vegetable oil, so they would be firm and last a bit longer.  Butter would have made them go stale quickly and I made these figurines 3 days before the party.

Below is the recipe I used for the RKT.  Measurements are approximate since I basically eyed it until I got the right texture and was able to sculpt with.
 
RKT Recipe (with vegetable oil):
16oz Bag of Mini Marshmallows
12 Cups Rice Crispy Cereal (I crushed them a little bit)
1 Tablespoon Vegetable Oil
1 Teaspoon Water

Coat a microwave bowl really well with shortening or vegetable oil.  Add marshmallows, drizzle with water and microwave in 30 second increments, stirring in between, until the marshmallows are all melted.  Add veg oil and stir well.  Add cereal and stir again until well incorporated.  Cover in an airtight container so it stays soft as you make your figures.  If it hardens, just put the amount needed into the microwave for about 5 seconds to soften it back up again.

This batch was enough to make the 3 dinosaurs, a number 1 cake topper and a 6" round "cake" that was 4" high.  I had about a cup left over.


Once the figurines are done being sculpted, cover them in modeling chocolate.  You can roll out modeling chocolate like fondant, then apply them in pieces over the sculptures.  The great thing in working with modeling chocolate, seams blend away easily and smoothly no matter how lumpy the underside is.

For this batch of modeling chocolate, I used white candy melts and tinted them with a combination of Chef Master Candy Colors and AmeriColor Gel colors.  Instead of using toothpicks, I use dry spaghetti as skewers to assemble the bodies together.  From experience, with kids, they love to bit down into figurines so I avoid using toothpicks to assemble things that could be eaten.

Updated March 2011:  See step by step photo's on my post, How to Make Modeling Chocolate


Here are the dinosaurs all decorated and waiting patiently to get on the cake.


For BJ (yellow dino), I stuck his shoes into the sides of the cake, spread piping gel over the tops, then lay his knees up over it.  All the the dino's are attached to the cake with piping gel.


They look so adorably happy...and cute =)

The top, 6" tier is actually all RKT rather than a cake.  I just filled 2, 6" round pans with the RKT, let it cool, then assembled it like a cake and covered it in buttercream and MMF.

The bottom, 9" tier is Chocolate Chiffon Cake filled with Strawberry Buttercream and Fresh Strawberries.

12 comments:

  1. This cake is adorable! Great job on the characters :)

    ReplyDelete
  2. Thank you Tanisha! It turned out really cute. The mom said that Evan waved at Barney when he saw it - so cute!

    ReplyDelete
  3. I absolutely love your work :=)

    ReplyDelete
  4. Hi there! I need to make a number '50' for an upcoming birthday. I noticed the number one you made. I have a couple of questions. When you say the modeling chocolate will dry, does it dry firm to the touch after using it on the number? Can you tell me how to make the RKT recipe with oil so I can make my five and zero ahead of time? Thank you!!
    azcat2002 at msn dot come

    ReplyDelete
  5. Cat: modeling chocolate softens as you work with it from the heat off your hand. If you let it sit aside, it firms up and is smooth to the touch but as soon as you start rubbing it, the heat off your hand will soften it back up again....hope that makes sense. It's great at blending in seams. I added the RKT recipe above to the post.

    ReplyDelete
  6. After using the RKT to make the forms, did you frost them with buttercream first, or just put the modeling chocolate directly onto them? You did an AMAZING job! :)

    ~Lani

    ReplyDelete
  7. Lani: I just added the modeling chocolate directly onto the RKT - no need for buttercream. Modeling chocolate works great at filling in the grooves and still give you a smooth surface.

    ReplyDelete
  8. Thank you for adding the recipe Angela. Love your web site.

    ReplyDelete
  9. Do you share recipes? I need a good strawberry butter cream! lol

    ReplyDelete
  10. Hi Kanga,

    I like making strawberry BC using fresh strawberries. There's a recipe at the bottom of my "Music Themed 80th Birthday Cake" post. I use it when making IMBC and BC. If you want it to look more pink, add a few drops of food coloring:
    http://sugarsweetcakesandtreats.blogspot.com/2010/06/music-themed-80th-birthday-cake.html

    ReplyDelete
  11. I see how you created a work around for BJ's "dangling" feet in this instance, but how would you create dangling appendages when they can't go directly into the cake? I've used gumpaste and like the fact that they can set up and have bending arms, etc. I hate that they aren't truely edible, though. In my limited experience with MC, I was unable to acheive the same effect. Will I have to use RKT? I was hoping to have a figure with a little less bulk. Any other suggestions? BTW, I discovered this link through soemthing posted on Pinterest and love, love, love your blog! Thank you so much!

    ReplyDelete
  12. I'm guessing, for dangling items, you could maybe use fishing line and something above it to hold it out like how some people stick wires out of cakes with stars or gems on the ends. Not sure of another way. RKT is bulky and if you smash it too much, it gets pretty heavy and defeats the purpose of having something light. Hope you are able to figure out a way...good luck. Thank you for loving my blog =)

    ReplyDelete