A Beatrix Potter Baby Shower Cake - The Tale of the Flopsy Bunny

CakeCentral Magazine
Volume 4 Issue 6 (June 2013)
3-page Spread
Photography by Bryan Ramsay Photography


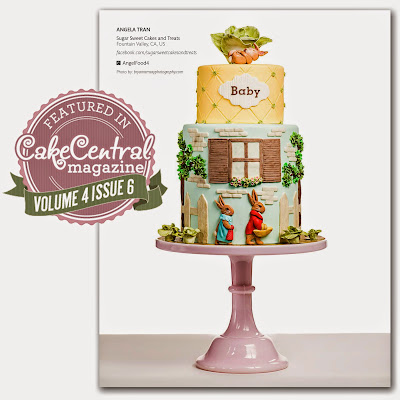
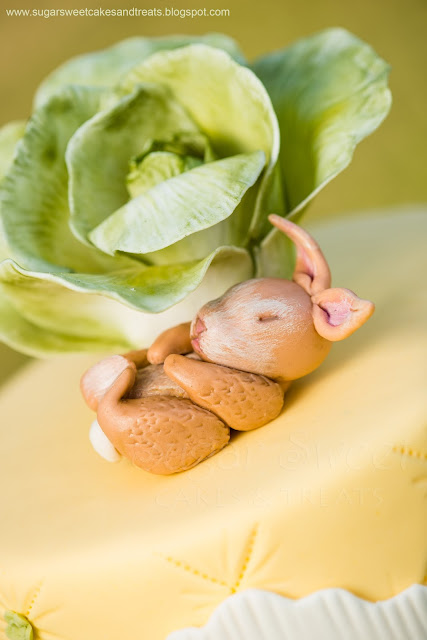
The theme Cake Central provided was a Beatrix Potter Baby Shower and the book I was assigned to design a cake around was, The Tale of the Flopsy Bunny. I have always admired Beatrix Potter, Peter Rabbit, and her illustrations and so I was excited to be making a cake for this theme. I wanted storybook to come through on the cake design - the cake topper would have one of the baby bunnies sleeping under the lettuce plant after filling his belly up with lettuce (food coma or as Beatrix Potter called it, soporific) and around the bottom tier, we would have farmer Mr. McGregor's house window (the one the Flopsies used to peek in through) with mommy (Flopsy) and daddy (Benjamin Bunny) walking along the farmers home.
Before I knew it, a week passed by, the deadline was inching closer, and I was still fighting off the awful flu. With my head in a fog, I had to get started on the cake! And, it never fails....Why is it that when you need something, you can never find it, but when you don't need it, it is found everywhere? I had to drive all around town to 3 cake supply stores to purchase cake dummies in the sizes I needed. A 6x4 inch round and 2, 8x4 inch rounds to build a double barrel. Then, I had to go to my local hardware store to buy a pail of Patch 'N Paint (it's the stuff you use to spackle and patch walls with).
With my sleeves rolled up, I was now ready to attempt prepping my first cake dummies. Just a month prior, a fellow cake club member, gave a demo on how to prepare cake dummies using Patch 'N Paint for display cakes. It spreads smoothly like buttercream, looks like buttercream, and dries within a few hours. Once the cakes are covered in the spackle and dried, give it a quick sanding to smooth out the surface, rub in a thin layer of shortening all over it, then cover with rolled fondant. Sounds easy, right? Well, real cakes are heavy and stay put when you ice them. Cake dummies, on the other hand, are light weight and just don't want to stay put as you try to spread on the spackle! I rolled packing tape up under the bottom of the cake dummy and attached it to a cake board in an attempt to to help keep the cake securely in place. With one hand, I held the top of the dummy down, while icing with the other hand. What a challenge that was! The Patch 'N Paint is awesome though, and it has the same texture and work-ability as buttercream. It's super light weight and dries within hours too! So much goodness in this neat product! Just look at how neat it looks after sanding it down smooth. You can't even tell it's a fake cake!
 |
| A blank, white canvas.... |
The cake dummies look just like a buttercream covered cake but without all that extra work in pulling together the ingredients and whipping up a batch of buttercream! Also, you can keep the cake dummy around for years to come and not worry about it spoiling. I'm loving this stuff!

For the cobblestone base, I rolled out balls of white fondant and smoothed them one by one next to each other around the board. After it dried, I dusted it over with an assortment of petal dusts to give it the depth and the illusion of a real cobblestone floor. What's an English garden without cobblestone, right?

The baby bunny was hand sculpted out of marshmallow fondant that I mixed with Tylose to help it dry hard and fast. I used scissors to snip the fur pattern around his body.

I cut out the lettuce leaves free hand (didn't have a cutter that was large enough for these) and veined them using a large, orchid leaf mold. They were originally made in white fondant, then dusted with yellow and green petal colors to resemble lettuce leaves.

The larger lettuce head is what I assembled with the loose leaves in the photo above that I had made a day prior to dry. The smaller ones were made at the last minute to add around the cake. I used a rose petal cutter to make the smaller lettuce leaves and dusted them the same way as the large one.

The fondant name plaque across the front of the cake was hand cut off a sketch I made. The ribbed texture across it was done by pressing down a skewer every 1/8 inch down into the name plaque. Upper Case and Lower Case Tappit Cutters
 were used for the "Baby" font.

Two trees were added to either side of the cake and I hand cut each leaf individually. Actually, I did improvise and created many, many clusters of leaves by using a mini 5-petal cutter (similar to a gumpaste rose calyx cutter). Each petal is rolled out thinly, then folded and pinched in the middle to resemble a cluster of leaves (see below). It worked perfectly in creating the illusion of many leaves while not having to actually make all those leaves. Turned out pretty cool, right?


I made 5 different shades of green for the leaves to create some depth on the tree and it took well over 200 of these 5-petal blossoms to fill both trees!

The leaves came out looking exactly how I was envisioning them and I absolutely love the effect and how they turned out.

Mr. and Mrs. Bunny were also hand sculpted and I used a pair of scissors to lightly snip the hair markings around their bodies.


A special thank you to Bryan Ramsay Photography for making the time to accommodate my last minute request, and for taking the beautiful photographs that made the cake, magazine worthy!
The photographer and I had to both wait quietly and patiently for 3 months to find out whether the cake made it into the magazine or not. It was torturous to not be able to talk or share the beautiful cake with anyone but now, we can finally show it off. Enjoy!

For the cobblestone base, I rolled out balls of white fondant and smoothed them one by one next to each other around the board. After it dried, I dusted it over with an assortment of petal dusts to give it the depth and the illusion of a real cobblestone floor. What's an English garden without cobblestone, right?

The baby bunny was hand sculpted out of marshmallow fondant that I mixed with Tylose to help it dry hard and fast. I used scissors to snip the fur pattern around his body.

I cut out the lettuce leaves free hand (didn't have a cutter that was large enough for these) and veined them using a large, orchid leaf mold. They were originally made in white fondant, then dusted with yellow and green petal colors to resemble lettuce leaves.

The larger lettuce head is what I assembled with the loose leaves in the photo above that I had made a day prior to dry. The smaller ones were made at the last minute to add around the cake. I used a rose petal cutter to make the smaller lettuce leaves and dusted them the same way as the large one.

The fondant name plaque across the front of the cake was hand cut off a sketch I made. The ribbed texture across it was done by pressing down a skewer every 1/8 inch down into the name plaque. Upper Case

Two trees were added to either side of the cake and I hand cut each leaf individually. Actually, I did improvise and created many, many clusters of leaves by using a mini 5-petal cutter (similar to a gumpaste rose calyx cutter). Each petal is rolled out thinly, then folded and pinched in the middle to resemble a cluster of leaves (see below). It worked perfectly in creating the illusion of many leaves while not having to actually make all those leaves. Turned out pretty cool, right?


I made 5 different shades of green for the leaves to create some depth on the tree and it took well over 200 of these 5-petal blossoms to fill both trees!

The leaves came out looking exactly how I was envisioning them and I absolutely love the effect and how they turned out.


Aren't the bunny-parents looking cute walking along the cobblestone path!
And here it is...3 pages in the June 2013 issue of CakeCentral Magazine (Volume 4, Issue 6). What an honor and an awesome opportunity to be a amongst cake artists from around the world and featured in an international cake magazine. I had so much fan improvising and trying new techniques with this cake!

A special thank you to Bryan Ramsay Photography for making the time to accommodate my last minute request, and for taking the beautiful photographs that made the cake, magazine worthy!
The photographer and I had to both wait quietly and patiently for 3 months to find out whether the cake made it into the magazine or not. It was torturous to not be able to talk or share the beautiful cake with anyone but now, we can finally show it off. Enjoy!
