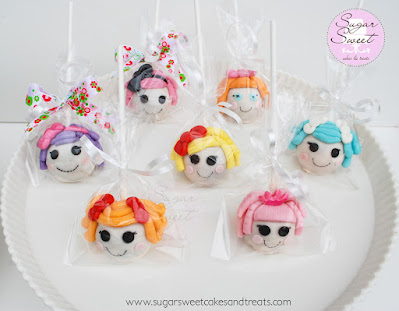
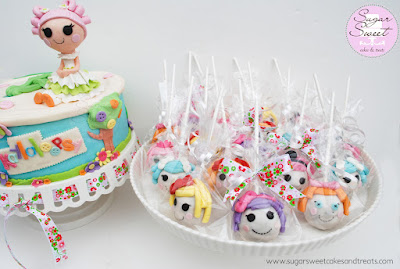
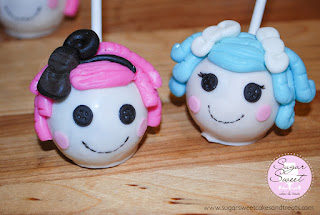
Do you know a Lalaloopsy? Ha-ha, I have gotten to know these dolls really well lately. They seem to be the biggest craze at the moment with little girls. Even my 4-year-old has a long list of ones she wants! I made a Lalaloopsy garden-themed cake with an assortment of Lalaloopsy cake pops for my niece's 9th birthday. They were a huge hit and it was so cute seeing all the girls recognize and name each cake pop doll.

Although these doll head cake pops were a challenge to figure out and time-consuming to make, they did turn out super cute and fun to eat!
Disclosure: This post may contain affiliate links and if you click on the link and purchase the item, I may receive an affiliate commission at no extra cost to you.
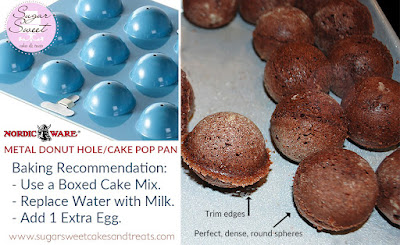
I've never been a big fan of cake pops. They're mashed-up cake that is just too sweet and covered in a chocolate coating that I don't care for much, but kids seem to go crazy over them and they're gobbled up instantly at any party. So, with the determination to make a cake pop that I would enjoy eating too, I bought a set of metal, Nordic Ware Donut Hole Cake Pop Pans so that the cake can be baked up into perfect circles without having to mash up cake in frosting then rolled into balls. I LOVED using these pans!
Cake Pop Pan Baking Tip: Use a cake box mix, substitute milk for water, and add an extra egg.
Using milk instead of water in a box mix makes for a better-tasting and higher-quality cake adding moisture while giving it a better structure for baking inside a shaped pan. It also helps eliminate any eggy flavor in the cake batter with the addition of the extra egg.
To try different cake pop trays, I did bake some cake balls using a Silicone Non-Stick Cake Pop Pan but they didn't work great. As the cake batter baked and expanded, the silicone could not hold its shape and a lot of the batter leaked out of the round cavities and into the seams. The excess batter around the edges of each sphere was thick, and even after trimming the edges off, the balls were more oval-shaped rather than round spheres. The cake ball itself was also very airy with a lot of large air pockets in them making them difficult to stay on popsicle sticks and dip into chocolate. Overall, I did not like working with the cake balls made in silicone baking trays.
| Silicone Cake Pops Tray Failure: Batter leaked around the edges and the balls were not perfect spheres and had too many air pockets. |
 |
| Metal Cake Pop Pan Success: Perfect spheres with a dense crumb. Very little batter leaked out around the edges. |
The metal cake ball/donut hole pans worked so much better and since they clamped down tightly, very little batter escaped out and into the edges. Any excess around the cake was easily trimmed off with a pair of kitchen shears. The cake balls were firm, smooth, and perfectly round. They were also easier to dip into chocolate versus the cake balls baked in silicone pans.
For the chocolate coating, I used vanilla Almond Bark with a little bit of Americolor Soft Gel Paste in a Copper Flesh Tone Color
 added to it to make them look closer to the same color as the dolls. I do prefer dipping cake pops into almond bark versus candy melts. Candy melts are a bit thicker and can only be tinted with candy colors (non-water based). Almond bark melts into a perfect dipping consistency, is easy to tint and flavor, plus is easily found in grocery stores.
I did have some trouble getting the cake balls to stay attached to the popsicle sticks when dipping them. The weight of the candy coating just tore the soft cake right off the stick! I did chill the cake balls before dipping them but it didn't seem to help. Basically, I ended up setting the cake ball down over a wire rack and spooned the candy coating around the cake ball. Then I scooped the cake pop up with the help of a spoon, lightly twirled it and taped off the excess coating onto the side of a bowl, and set the cake pops over a piece of parchment paper using an egg carton to hold the sticks up at a 45-degree angle.
I did try piping chocolate for the doll's hair but it just didn't look right. Therefore, in an attempt to make their hair look exactly like on the actual dolls, I made them out of Marshmallow Fondant (MMF) - I love how they turned out! Although each doll took an average of 20 minutes to decorate, it was worth it in the end.
 |
| Making Spot Splatter Splash's Hair |
How to make Lalaloopsy Doll Hair in MMF:
First, roll out MMF into a long rope about 1/4-inch thick. Next, slice it up into varying lengths (1 inch to 1 1/2- inches long). Lightly score each rope a few times to look like strands of hair. Using piping gel as glue, attach them one by one to the cake pop. The piping gel sticks really well to chocolate and candy coatings - water will not work!
For the Piping Gel recipe, visit the bottom of my post HERE: Japanese Beetle Cake
 |
| Pillow Featherbed Lalaloopsy Cake Pops |
Adding details to Cake Pop Dolls:
Use a round piping tip to make the eye. Use a larger, round piping tip to cut out the circle then use a slightly smaller round piping tip to make an impression inside the eye. Then, use a toothpick or a thin tool, to punch out the button holes in each eye. For the cheeks, roll out a very thin piece of fondant and with a round piping tip, cut out the cheeks. You can also dust checks instead with petal dust. If the petal dust won't stick, dust the surface first with a little bit of cornstarch to remove any oily residue from the candy coating. The mouth and lashes are painted with a thin brush and black AmeriColor Gel.
 | |
|
Wrapping Cake Pops into Party Favors:
Each doll was individually wrapped in clear, Cellophane Treat Bags, heat sealed with an Impulse Sealer, then tied with curly ribbon and a satin bow.
The Lalaloopsy dolls I made cake pops of are (named from front left to right), Spot Splatter Splash, Jewel Sparkles, Pillow Featherbed, Dot Starlight, Mittens Fluff 'n' Stuff, Crumbs Sugar Cookie, and Bea Spells-a-Lot.
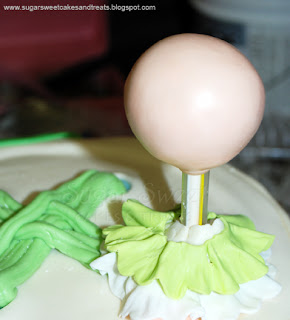
By the time I finished decorating and bagging the cake pops, it was 4:00 a.m. and I still had the cake to cover and decorate. So, this is the only photo taken of the cake process but at least it shows you the basic structure of the cake topper.
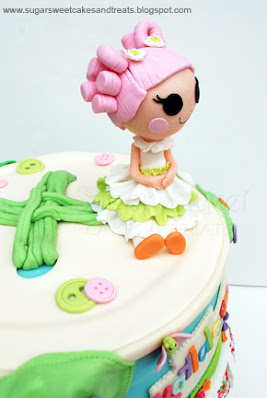
The head of the topper is mashed-up cake rolled into a 1 3/4 inch sphere. It's covered over in a 50/50 mix of modeling chocolate and MMF. I inserted a popsicle stick into her head like a cake pop and for extra support (and since her head was heavy), I added a boba straw that ran down into the cake's baseboard and up into her head. Her clothing was built in layers of ruffles with gum paste since by the time I started making her, the sun had already come up, the birds were chirping outside, and the party was to start in a few hours - I needed it to dry fast!
And here she is all completed... Blossom Flower Pots is her name.
 |
| Blossom Flowerpots Lalaloopsy |
Note her toes. All the dolls' toes touch so I had to make her toes touch too! The little details do really make a difference (wink)!
Each tree around the cake is stuffed with mini marshmallows to help make them look puffy.
I also incorporated my niece's name into the Lalaloopsy label...Kayla-loopsy! After my daughter saw this cake, she now wants the same theme for her 5th birthday next month. I'm looking forward to making these cute dolls again! Read about it HERE, Lalaloopsy Cake and Dessert Table (Toffee Cocoa Cuddles)
I did manage to get some sleep before the party...all 2 hours worth =) My sister-in-law did make me one of her delicious cups of coffee to help me get through the day. The things we go through to make a cake I tell ya! But seeing the joy on the kid's faces and their eyes light up is well worth it.
 |
| See my daughter's Lalaloopsy Themed Cake here: Lalaloopsy Cake and Dessert Table (Toffee Cocoa Cuddles) |


