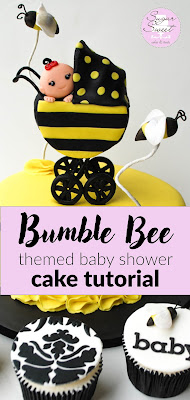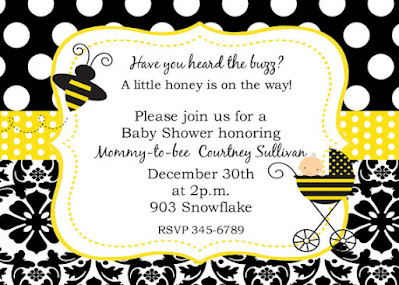
I designed this adorable, Bumble Bee-themed Baby Shower Cake for a friend to match their invitation. I was shown a picture of the invitation and given free rein to do as I wished for the cake and cupcakes: Having the creative freedom to make art is awesome! Included are details on how I made this cake.

Table of Contents
- How to make black and yellow Marshmallow Fondant (MMF)
- How to construct a fondant baby carriage
- How to make 3D fondant bumble bees
- How to stencil a Damask pattern with black icing on white fondant (no smudges)
- How to make true, black royal icing
- How to achieve floating toppers on cupcakes
- Recipe: Piping Gel
My favorite cakes are typically the ones that I get free reign to make and, for the most part, are a total secret until delivery. Wouldn't you love a surprise? I do spend hours upon hours, sketching and contemplating the design for days on end and nearly always, change up an element in it during the assembly process as I see the cake come together physically. Free reign allows creative freedom to add special elements and details to a cake, try new techniques, and develop a signature style.
The invitation for the baby shower had so many pretty details that I wanted to incorporate into the cake and cupcakes: Black and white polka dots, yellow and white polka dots, black and white damask pattern, bumble bees, and an adorable baby peeking over an antique, baby carriage.
 |
| Baby Shower Invitation by Note-able Chick (Etsy.com) |
There were a lot of elements to get made for the cake and cupcake toppers, and since I have little kids and a day job, I'm typically up late into the wee hours of the morning working on cake stuff. I did manage to capture a few photos of the process to share with you all.
Making the Marshmallow Fondant (MMF):
- To make the Yellow MMF, I used AmeriColor Electric Yellow Soft Gel Paste
- To make the Black MMF, I used Semi-Sweet Chocolate Chips and AmeriColor Super Black Gel Paste.
- Follow my steps HERE, How to Make MMF Using Candy Melts. It's super easy to get dark colors following my recipe. You can use black candy melt wafers or any type of brown chocolate chips.
- Note: If you take a good look at black candy wafers, they're basically, a very dark brown color. Therefore, do not fret if you can't find black candy melts since brown chocolate works as well.
Construct the Baby Carriage:
Cake Fixation used to have a lovely tutorial on how to make the carriage but, since I last checked, that webpage is no longer found. I basically followed their process of making a stroller using Styrofoam and wire but then improvised, making my own modifications to work with the materials I had. For starters, the piece of Styrofoam I used was very soft so I ended up taping it a couple times in packing tape to keep it all together, and since I couldn't "stab" the 18-Gauge White Floral Wire into it, I taped up all the wiring around the structure of the stroller using lots of masking tape to make sure nothing moved around. It actually worked better this way since the wires stayed put and didn't slide about when I covered the whole thing in fondant.
To attach the fondant to the stroller, I used piping gel (the recipe is at the bottom of this page).
First, I covered the top and bottom of the stroller with a strip of black fondant, then I made 2 black and yellow striped half-circle pieces for the sides.
How to Make Striped Fondant:
To make straight and clean-looking fondant bands, I use a technique taught by Jessica Harris Cake Design. You build the striped design over a piece of parchment paper, then once it's cut to the size and shape you need, flip the piece over the side of the cake, and peel the parchment paper off. The design and stripes stay in place perfectly.
Steps to Making Perfect Fondant Strips:
- Take a piece of parchment or wax paper, and spread a thin coating of shortening over it.
- Lay your stripes of fondant on the parchment paper. Use a moist brush to add a tiny bit of water along the edges to help glue the stripes, side by side, together.
- To get uniform stripes, I like using a Pasta Dough Roller to roll the thickness evenly. Then, I measure out each stripe using a Clear Acrylic Quilting Ruler over the fondant to slice equal-width pieces with a sharp blade (see photo below).
- Once you have the pattern laid out over the parchment paper, use a circle cutter, that's the same width as the width of the stroller, and cut the half-circle shape out. Brush the side of the stroller structure with piping gel for glue. Pick up the parchment paper with the striped, half-circle piece, then place it over the side of the stroller, and finally peel the parchment paper off. Smooth the edges with your finger and press gently to attach and remove any air bubbles caught under the surface.
To get the polka dots on the canopy to look flat and smooth, I added the yellow dots onto a sheet of black fondant (make the polka dots slightly smaller than the size you want). Then, with a rolling pin, gently roll out the entire piece to flatten the yellow polka dots into the black fondant.
Tip: Be sure to apply even pressure while rolling the polka dots into the fondant and also, roll in all different directions to keep the polka dots round and uniform in size and shape.
.jpg)
Wires in Cake Tip:
The wired bumble bees are sitting in coffee stirs inside the cake. Coffee stirs are thinner than straws and fit popsicle sticks and wires well. I like using this method with cake toppers so that when you pull the toppers out to serve the cake, they're clean and not covered in sticky icing.

How to Construct Fondant Wheels with Spokes:
To make the wheels for the baby carriage, I cut out the round, tire shape using 2 round piping tips (each close in size): 1 piping tip to cut the outside of the wheel, then a slightly smaller piping tip to cut out the inside of the wheel.
The spokes were made by rolling out a thin log of fondant, then trimmed down into 4 pieces that fit inside the wheel (see photo above). Once the spokes were attached to the wheel, I punched a hole in the middle with a #1 piping tip. Then, I brushed it all over with a thin layer of water, front and back, a couple times throughout the evening letting it dry between each coating, to make sure the fondant pieces melted and fused to each other and wouldn't come apart.
You can also use gum glue or tylose-glue for as a strong, edible adhesive. To make Tylose or Gum-Tex glue, just take a teaspoon of the powder and mix it with a few drops of warm water to achieve a glue-like consistency. Don't make it too thin; the less water used, the stronger the adhesion.
The Finishing Touches on the Stroller:
I painted the handlebar and stroller legs with straight, black gel colors. I then bent the bottom inch of the stroller legs down 90° so that I could insert the stroller straight into the cake (the stroller legs were originally at a 45° angle). Since I didn't make the wires for the stroller legs long enough to support the stroller securely on the cake, I inserted coffee stirs straight down into the cake under each leg of the stroller. To fill in the extra gap between the coffee stir and the wire, I wrapped extra floral tape around the legs so that they would fit snugly inside the coffee stirs. The stroller didn't budge! It was as snug as a bug!
Once the stroller was in place on the cake, I attached the fondant wheels on each side of the stroller legs using black royal icing to add some bulk (and security) around the wire and wheels. I finished off the stroller by adding a little baby head with her tiny hands holding onto the stroller basket. Since the baby was a girl, I added lashes and a red bow versus what the actual invitation had (all the little details really do make a difference).
How to Make 3D Gum Paste Bumble Bees:
These bees can be made out of gum paste, but I made them with fondant (MMF) mixed with Gum-Tex to help them dry hard. It was the middle of the night and I forgot to take pictures of them before they were completely assembled. Hopefully, my explanation will give you an idea of how to make them.
To make the bee bodies, I rolled out 5 small balls of fondant (3 black and 2 yellow). Each ball is slightly smaller than the previous one:
- The 1st ball, black, will be the largest for the head.
- The 2nd ball, yellow, will be slightly smaller than the 1st ball of fondant.
- The 3rd ball, black, will be slightly smaller than the 2nd, for the middle torso.
- The 4th ball, yellow, will be slightly smaller than the 3rd.
- The 5th ball, black, will be slightly smaller than the 4th for the pointy tail.
Take all 5 balls of fondant, while keeping them as round spheres, stack the balls one on top of the other, in order from largest to smallest. Brush a tiny bit of water between each layer to help glue the spheres together. With all 5 spheres stacked and attached, gently press them down together, then continue to gently smash and roll the body into shape, keeping it in a cylindrical cone, until the striped seams are blended into one, smooth piece. Once you have a cylindrical cone shape for the bee's body, bend the cone slightly to give it a little bit of a curve.
Below is a photo using the same technique to make the bee's body, but to make Halloween Candy Corn.

I cut out small rose petals (teardrop shape) for the bee's wings, attached them to their backs, then left them to dry over piping tips so that they would dry with a natural curvature to them. Once the wings were dry, I painted them with a thin layer of piping gel thinned out with vodka, then sprinkled Rainbow Disco Dust over them. I then dusted the entire bee's body with Yellow Luster Dust.
For the antennas, I wrapped a thin, 1" long wire with White Floral Tape. Bent the wire in half to form a V-shape, then curled in the ends. I inserted them into the bee's head using piping gel for glue and once everything was dry, I painted the antennas with black gel colors.
How to Make Stenciled Damask Pattern with Royal Icing:
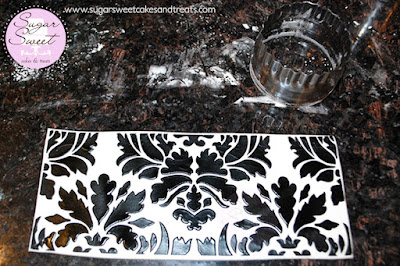
This was my very first time using a stencil and I was honestly stressed out about how I was going to do black royal icing over white fondant - it's so unforgiving and unfixable if it didn't work. I read through a tutorial on Facebook by Lesley at The Royal Bakery about stenciling a Damask on a cake and applied her tips here. The stencil used here is by Designer Stencils (Designer Stencils Damask Cake Stencil Side (4.5"H x 12.5"W). I did do some practice pieces to get the pressure and technique down, as well as the right consistency for the royal icing. I did not want the royal icing to smudge or bleed onto the white fondant! I love the contrast between the black and white, very bold and beautiful!
Steps to Stenciling with Royal Icing:
- Roll out a sheet of fondant with an even thickness. For the cupcake, I like the toppers to be 1/8" thick. Using a Pasta Dough Roller makes it easy to get consistent sheets of fondant in the exact thickness needed.
- Rub the very thin layer of shortening across the top surface of the fondant. This will help stick and hold the stencil in place as well as help seal the stencil tightly up against the fondant.
- Lay the stencil in place over the fondant, then gently roll a rolling pin over the stencil to help seal it in place.
- With an Off-Set Spatula, carefully spread black royal icing (toothpaste consistency) across the surface of the stencil, gently scrape off any excess, then carefully lift the stencil off. Wash and dry the stencil well between uses.
- Allow the fondant piece with royal icing to dry for about 10 minutes, then use a round 2.25" cutter to cut out the cupcake topper. Allow the toppers to dry over a cell foam pad (foam allows for air to circulate under the fondant and dry it flat and faster).
How to Achieve True, Black Royal Icing Tips:
- Make your royal icing at least 1 day ahead to give the dark colors time to mature and darken.
- Mix the following 3 colors together:
- Add a couple drops of AmeriColor Super Black Gel Paste.
- A drop of AmeriColor Burgundy Gel Paste.
- And a drop of AmeriColor Royal Blue Gel Paste.
From experience in making dark colors in fondant and icing, I find this 3-color combination works the best in achieving a very black color. Black gel coloring, used alone, has a slight green tint to it. Adding burgundy will help remove the green while blue, will help deepen the shade of black. This works for me every time without fail.
How to Cupcakes with Floating Toppers:
Lately, I have been loving the look of flat-topped cupcakes with floating toppers and to achieve this look, cupcake pans are filled just under 3/4 with batter so they don't bake and grow taller than the actual liner. Once the cupcakes are baked and cooled, I spread buttercream across their tops and scraped off the extra frosting straight across the top of the liner using an offset spatula. I then add a small, 1" high swirl of buttercream to the middle of the cupcake, and gently press the fondant disk on it.
Each cupcake topper fondant disk is a 2.25" circle, 1/8" thick. To roll out fondant into even thicknesses, use a Pasta Dough Roller. Knead some Gum-Tex into the fondant to help them dry hard and make them at least 1 day ahead to allow time for them to dry into a firm, flat disk. Place the fondant disks over a cell foam pad to help them dry faster.
Piping Gel Recipe:
- 1 Tbsp Gelatin (1 envelope)
- 1 Tbsp Water
- 1 Cup Corn Syrup
Directions: In a small pot, add the gelatin and water and let it sit for 5 minutes for the gelatin to soften and absorb the water. Add the corn syrup and heat, on low, stirring continually until it's all blended together evenly and the gelatin is completely melted. Remove from heat, scrape off any foam that might have developed while heating, transfer to an airtight container, and store in the fridge until ready to use.
The piping gel has many uses and can easily be thinned out with vodka for different applications. It helps stick edible glitter to surfaces and it dries nice and shiny without leaving a sticky surface.
Check out how I made this Japanese Beetle Bug Cake - its body is painted in Piping Gel!
Be sure to stop by my other posts for more tips and tutorials to help through your cake-decorating journey!


.jpg)
.jpg)
.jpg)

.jpg)
.jpg)
.jpg)
.jpg)

.jpg)

.jpg)


